


Insights
Webflow
Copy Link


Planifique paso a paso para pasar de WordPress a Webflow sin perder el SEO: auditoría, exportación, redireccionamientos 301 y monitoreo.
Migración desde WordPress a Webflow puede proteger tu SEO e incluso mejorarlo si lo haces con cuidado. El proceso implica auditar su sitio actual, exportar contenido y configurarlo Webflow CMS y configuración de ajustes de SEO como redireccionamientos y metadatos. Siguiendo Consejos de SEO para Webflow durante esta fase, se asegura de que su nuevo sitio esté optimizado para la generación de clientes potenciales desde el primer día. Este es un resumen rápido de los pasos clave:
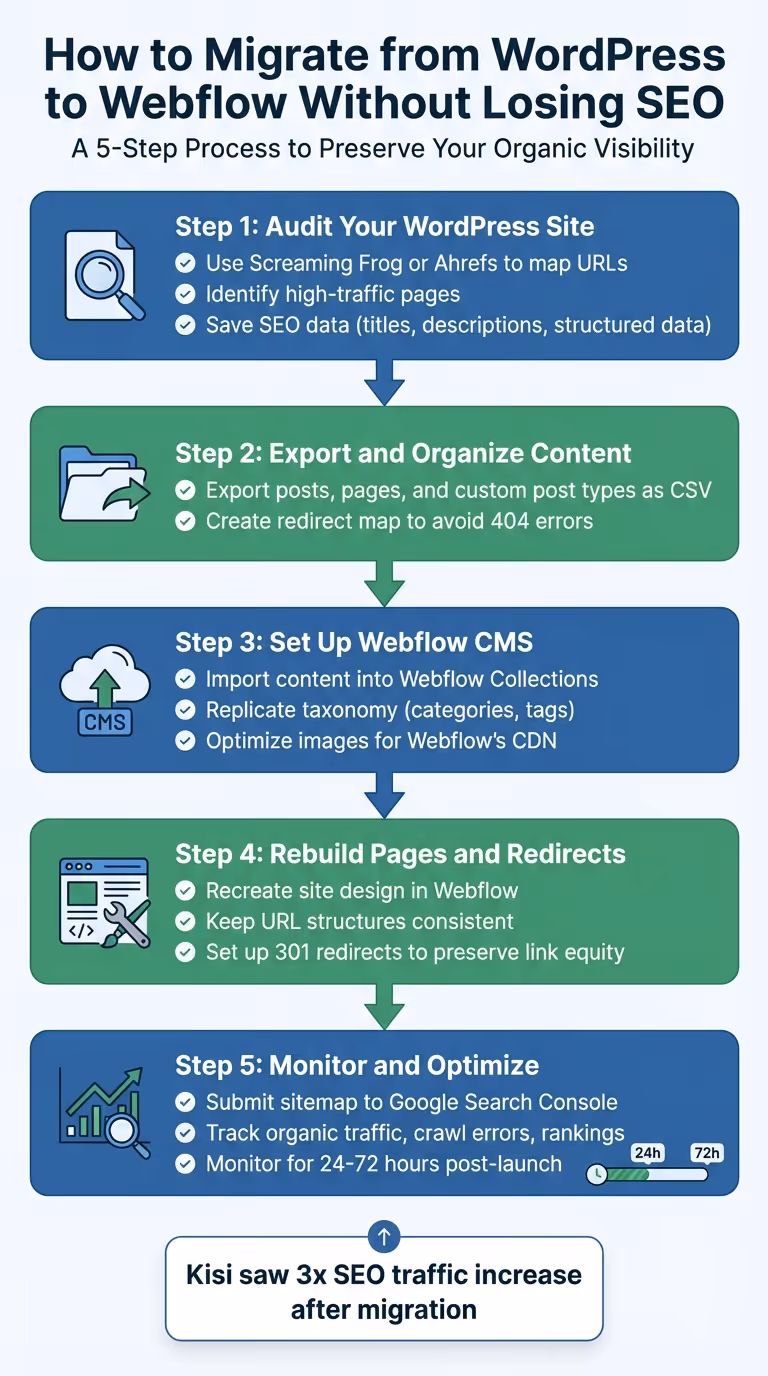

Antes de sumergirte en el proceso de migración, es crucial comenzar con una auditoría exhaustiva de tu sitio de WordPress. Este paso ayuda a evitar páginas rotas, pérdida de tráfico y otros problemas que podrían dañar el rendimiento de tu sitio. Como explica el equipo de Webflow:
Usa herramientas como Screaming Frog o Ahrefs para rastrear tu sitio de WordPress y compilar una lista maestra de URL activas, códigos de estado, etiquetas canónicas y enlaces internos. Esto garantiza que no se pase por alto ninguna página durante la migración.
En tu hoja de cálculo de auditoría, prioriza las páginas con mucho tráfico y aquellas con perfiles de backlinks sólidos. Estas páginas son fundamentales para mantener el rendimiento actual de tu sitio. Además, documenta todos los complementos activos, las personalizaciones de temas y las integraciones de terceros. Si bien estos elementos no se transferirán directamente a Webflow, tendrás que replicar su funcionalidad con las herramientas o integraciones integradas de Webflow.
Guarda manualmente los metadatos SEO importantes, como los metatítulos, las descripciones y los datos estructurados, ya que a menudo no se migran automáticamente. También es un buen momento para limpiar tu sitio eliminando el contenido obsoleto o duplicado, lo que puede ayudar a simplificar la estructura de tu nuevo sitio.
Componente de auditoría
Datos a recopilar
Herramientas recomendadas
URL activas, códigos de estado, etiquetas canónicas
Screaming Frog, Ahrefs
Metatítulos, descripciones, datos estructurados
SEO Crawlers, complementos de WordPress
Clasificación de palabras clave, tráfico, backlinks
Consola de búsqueda de Google, Ahrefs
Tipos de publicaciones, campos personalizados, taxonomías
Panel de control de WordPress,
Plugins activos, formularios e integraciones de terceros
Auditoría manual
Una vez que haya completado la auditoría, organice los datos en un inventario estructurado para guiar los pasos siguientes.
Crea una hoja de cálculo detallada que clasifique todo el contenido de tu sitio. Separa las páginas estáticas (como «Acerca de» o «Contacto») del contenido dinámico, ya que se gestionarán de forma diferente en Webflow. Por ejemplo, las publicaciones de blog suelen pasar a Colecciones de Webflow CMS para gestionar el contenido dinámico para el SEO, mientras que las páginas estáticas permanecen como están.
Toma nota de cómo están estructuradas tus categorías y etiquetas de WordPress. Estas taxonomías deberán recrearse como colecciones de CMS en Webflow, ya que la plataforma las administra de forma diferente. Exporta tu contenido por tipo de publicación con herramientas como WP All Export, y guarda archivos CSV independientes para publicaciones, páginas estáticas y tipos de publicaciones personalizadas. Esto hace que el proceso de importación a Webflow sea mucho más sencillo.
Además, crea un mapa de redireccionamiento que empareja cada URL de WordPress con su nuevo destino de Webflow. Este paso es esencial para evitar errores 404 y preservar la equidad de los enlaces de tu sitio. Durante esta fase, implementa una congelación del contenido para garantizar que los datos exportados sigan siendo precisos mientras te preparas para la migración.
Establezca objetivos claros y medibles para hacer un seguimiento del éxito de su migración. Estas pueden incluir mantener las clasificaciones actuales de las palabras clave, preservar el tráfico orgánico y garantizar que todos los metadatos se transfieran correctamente. También puedes implementar Estrategias SEO de Webflow para mejorar la estructura del sitio y la generación de leads durante la transición. Documenta las métricas de rendimiento actuales de tu sitio, como la clasificación de palabras clave y los perfiles de backlinks, para poder compararlos con los datos posteriores al lanzamiento.
Sus objetivos principales deben incluir:
También puede utilizar la migración como una oportunidad para mejorar Core Web Vitals puntuaciones comparadas con tu sitio de WordPress.
Elija un período de poco tráfico para la migración, en función de sus datos de análisis, y planifique un período de lanzamiento de 24 a 72 horas. Esto facilitará la identificación y la solución de cualquier problema específico de la migración. Aproximadamente 24 horas antes del lanzamiento, reduce la configuración del tiempo de vida (TTL) del DNS para acelerar la propagación de los cambios en los servidores de Webflow. Sin embargo, tenga en cuenta que las actualizaciones de DNS aún pueden tardar hasta 48 horas en propagarse por completo.
Con tu plan de migración listo, el siguiente paso es extraer tu contenido de WordPress y prepararlo para Webflow.
Empieza por exportar tu contenido de WordPress como archivos CSV con herramientas como WP All Export. Esto te ayudará a organizar tus datos para las colecciones de CMS de Webflow.
Antes de exportar, haz una copia de seguridad de tu base de datos, contenido multimedia y complementos de WordPress para asegurarte de tener una red de seguridad en caso de que algo salga mal. Exporta archivos CSV independientes para cada tipo de publicación de WordPress específico, como «Publicaciones de blog» o «Miembros del equipo». Este enfoque mantiene todo ordenado y simplifica el proceso de importación a Webflow.
Asegúrate de incluir los metadatos esenciales de SEO, como metatítulos, descripciones y datos estructurados, en tus archivos CSV. También puedes documentarlos por separado si es necesario. La lista de URL exportada también será crucial para configurar el mapeo de redireccionamiento más adelante. Usa esta migración como una oportunidad para comprimir y optimizar las imágenes antes de subirlas a Webflow, lo que puede mejorar tu rendimiento de alojamiento del sitio.
Una vez que sus archivos CSV estén listos, es hora de configurar sus colecciones de Webflow CMS.
Ahora, importa tus archivos CSV organizados a Webflow y crea colecciones que reflejen tu estructura de WordPress. Durante la importación, asigna las columnas de tu CSV a los campos de colección correspondientes en Webflow. Por ejemplo, asigna una columna de «Contenido de la publicación» a un campo de texto enriquecido.
Antes de importar, comprueba los límites de recopilación de tu plan Webflow. Los planes CMS permiten hasta 2000 artículos, mientras que los planes Business pueden gestionar hasta 10 000 artículos en todas las colecciones. Ten en cuenta que Webflow tiene un límite de 60 campos por colección y permite un máximo de 10 campos de referencia o referencias múltiples por colección.
Si tu contenido incluye relaciones, como autores o categorías, importa primero los datos a campos temporales de «texto sin formato». Tras importar todas las colecciones, puede crear campos de referencia o de referencias múltiples y vincularlos manualmente. Una vez establecidas las relaciones, elimine los campos de texto temporales. Para garantizar que todos los archivos multimedia estén alojados en CDN de Webflow para un mejor rendimiento, usa el panel de activos de Webflow o importa activos de forma masiva a través de CSV.
Mantener el contenido organizado es clave. Para replicar el sistema de taxonomía de WordPress en Webflow, convierte las categorías y etiquetas en colecciones independientes de Webflow CMS. A diferencia de WordPress, Webflow no tiene un sistema de taxonomía integrado, por lo que tendrás que crearlos como colecciones independientes. Usa campos de «Referencia» para categorías individuales y campos de «Referencia múltiple» para múltiples etiquetas a fin de mantener las relaciones.
Importe las colecciones de taxonomías (como categorías, etiquetas y autores) antes de importar el contenido principal. Cuando prepares tus archivos CSV, formatea varias categorías o etiquetas en una sola celda utilizando puntos y comas como separadores (por ejemplo, «SEO, Migración o Webflow»). Esto garantiza que Webflow los reconozca como referencias independientes. Asegúrese de que los nombres de las categorías y etiquetas de su CSV de contenido principal coincidan exactamente con los de sus colecciones de taxonomía, ya que la asignación de referencias de Webflow distingue entre mayúsculas y minúsculas.
Elimine cualquier código corto específico de WordPress, como [galería], de tu contenido, ya que no se mostrarán en los campos de texto enriquecido de Webflow. Además, asegúrate de que todas las rutas de imagen de tu CSV sean URL absolutas (incluido el dominio completo). Esto permite a Webflow buscar y alojar las imágenes en su CDN durante el proceso de importación. Mantener tu sitio de WordPress activo durante este paso es crucial para que Webflow pueda descargar correctamente los recursos multimedia enlazados. Las rutas multimedia consistentes ayudarán tanto a la velocidad de carga como al SEO.
Una vez que tu contenido se importe a Webflow CMS, el siguiente paso es reconstruir tus páginas de WordPress y ajustar tu configuración de SEO. Esto garantiza que tu sitio no solo tenga un aspecto impecable, sino que también conserve las clasificaciones en los motores de búsqueda por las que tanto te has esforzado.
Empieza por recrear tus páginas de WordPress con las herramientas de diseño visual de Webflow. Si tienes acceso al plugin Figma to Webflow, puedes simplificar el proceso. De lo contrario, puedes explorar sitios o plantillas «Made in Webflow» en busca de inspiración y adaptarlos para que se ajusten al estilo de tu marca.
Cuando trabajes con contenido dinámico, como publicaciones de blog o perfiles de miembros del equipo, asigna los campos CSV exportados a los campos de Webflow CMS Collection. No olvides volver a aplicar metatítulos, descripciones y cualquier datos estructurados (marcado de esquema) como se describe en el paso 1. Este paso es esencial para mantener la continuidad de su SEO. Para mantener tu sitio organizado y escalable, considera usar un marco CSS como El cliente es lo primero o Mástil.
Una vez reconstruidas tus páginas, es hora de asegurarte de que tus estructuras de URL estén alineadas con tu configuración original de WordPress.
Mantener estructuras de URL consistentes es crucial para el SEO. Mantén los slugs de URL de Webflow idénticos a los de WordPress para evitar alterar las clasificaciones de búsqueda. Crea una lista maestra que asigne tus antiguas URL de WordPress a sus nuevas contrapartes de Webflow. Actualiza todos los enlaces internos para eliminar las cadenas de redireccionamiento innecesarias.
Si tu sitio de WordPress utilizaba slugs de URL planos, ajústalos para que se ajusten al formato de carpetas de colección de Webflow, como /blog/nombre de la entrada.
Una vez establecida la estructura de las páginas y las URL, el siguiente paso es configurar los redireccionamientos 301 para garantizar un flujo de tráfico fluido. En Webflow, navega hasta Configuración del sitio > Publicación > Redireccionamientos 301 para añadir tus reglas de redireccionamiento. Para cada redireccionamiento, introduzca la «ruta anterior» (p. ej., /página antigua) y la opción «Redirigir a la ruta» (p. ej., /nueva-página) y, a continuación, publique su sitio para que los cambios surtan efecto.
Para los cambios a nivel de directorio, puede usar redireccionamientos con caracteres comodín con grupos de captura. Por ejemplo, defina la ruta anterior como /carpeta antigua/ (.*) y el nuevo camino como /carpeta/ %1 para redirigir eficazmente todas las páginas de una carpeta. Este enfoque reduce la cantidad de reglas de redireccionamiento, que idealmente deberían mantenerse por debajo del límite recomendado por Webflow de 1000 para mantener el rendimiento del sitio.
Si ya existe una URL conflictiva en Webflow, tendrás que eliminar la página, guardarla como borrador o ajustar su slug antes de que la redirección funcione. En el caso de las URL con cadenas de consulta, coloca como prefijo los caracteres especiales de la «Ruta antigua» % (p. ej., ¿%? categoría%=comida). Una vez que todo esté configurado, prueba tus redireccionamientos en modo incógnito o usa un curl -I [URL] comando para confirmar que devuelven el estado «301 trasladado permanentemente».
«Los redireccionamientos 301 son una buena práctica, especialmente si quieres mantener el poder de clasificación de la URL anterior». - Webflow
Para migraciones más grandes, la función de importación y exportación masiva de Webflow puede ayudarlo a administrar los redireccionamientos a través de archivos CSV. Prioriza los redireccionamientos a las páginas con el mayor tráfico orgánico y los perfiles de backlinks más sólidos para preservar la autoridad de tu sitio.
Una vez que tus redireccionamientos estén activos, comienza la siguiente fase: garantizar que los motores de búsqueda puedan rastrear e indexar correctamente tu nuevo sitio de Webflow. Este paso es crucial, ya que cualquier descuido puede afectar negativamente a tu clasificación. Se trata de prestar mucha atención a los detalles y vigilar el rendimiento.
Antes del lanzamiento, usa herramientas como Rana gritando o Ahrefs para rastrear tu sitio y recopilar todos los metadatos, como títulos, descripciones, etiquetas canónicas y códigos de estado. En Webflow, replicar el marcado de su esquema (por ejemplo, el esquema de BlogPosting para artículos) dentro de la configuración de la página o añadiendo código personalizado. Comprueba su precisión con Prueba de resultados enriquecidos de Google.
Para mantenerte organizado, crea una hoja de cálculo maestra en la que figuren todas las URL, junto con su título y sus etiquetas canónicas. Esto sirve como referencia útil durante el proceso de migración. Cuando tu sitio esté en funcionamiento, vuelve a realizar una auditoría de SEO para detectar cualquier metadato faltante, enlaces duplicados, etiquetas «no indexadas» extraviadas o imágenes rotas que puedan haber pasado desapercibidas.
Una vez que te hayas asegurado de que tus metadatos están en su lugar, el siguiente paso es enviar tu mapa del sitio actualizado a Google Search Console.
Active el mapa del sitio generado automáticamente por Webflow y envíe el sitemap.xml archivar en Consola de búsqueda de Google. Utilice el método de verificación de etiquetas HTML para confirmar la propiedad. Comprueba que el «Estado» diga «Correcto» y comprueba que el recuento de «URL descubiertas» coincide con el total de páginas esperado.
Si tu migración implicó cambiar de dominio, aprovecha las ventajas de Google Cambio de dirección herramienta en Search Console. Esto notifica a Google sobre el traslado de tu antiguo dominio de WordPress a tu nuevo dominio de Webflow. Enviar tu mapa del sitio inmediatamente después del lanzamiento ayuda a los motores de búsqueda a indexar tu nueva estructura de URL más rápido.
Después de enviar tu mapa del sitio, es hora de supervisar de cerca el rendimiento. Planifica un período de 24 a 72 horas después del lanzamiento para hacer un seguimiento de las métricas. Usa Google Analytics para monitorear las tendencias del tráfico orgánico y compararlas con los puntos de referencia anteriores a la migración. En Consola de búsqueda de Google, revise periódicamente el estado de la indexación, el rendimiento de las búsquedas (clics, impresiones, CTR, posición media) y los errores de rastreo durante las primeras semanas.
Realiza auditorías en tu sitio activo con herramientas como Screaming Frog o Ahrefs para identificar enlaces rotos, problemas con el código de estado o etiquetas canónicas faltantes. Incluso si tus pruebas de puesta en escena se realizaron sin problemas, el entorno en vivo puede comportarse de manera diferente. Comprueba que las URL antiguas se redirigen correctamente sin crear bucles o cadenas; opta por redireccionamientos sencillos de la A a la B. Para anticiparte a los posibles problemas, configura alertas automáticas para detectar picos de errores 404 o problemas con el servidor. Además, usa Información sobre PageSpeed y Core Web Vitals en Search Console para supervisar la usabilidad móvil y velocidades de carga de página.
En el caso de páginas con backlinks fuertes, dirígete a sitios externos que enlacen a estas páginas y solicita enlaces actualizados a tus nuevas URL. Este enfoque proactivo puede ayudar a retener la equidad de los enlaces, complementando tus redireccionamientos 301. Una vez que solicites manualmente la indexación de páginas específicas en Google Search Console, podrás recibir actualizaciones en un plazo de 24 a 48 horas.
Cambiar de WordPress a Webflow puede mantener, si no mejorar, tu rendimiento de SEO, siempre que abordes la migración con cuidado. Empieza por auditar tu contenido, configurar 301 redireccionamientos y asegurarte de que todos los metadatos esenciales se transfieran correctamente.
Una vez que la migración esté en marcha, vigila de cerca tu sitio durante las primeras 24 a 72 horas. Usa herramientas como Google Search Console para comprobar si hay errores de rastreo, comprobar que los redireccionamientos funcionan según lo previsto y realizar comprobaciones de estado diarias para solucionar cualquier problema rápidamente.
Una de las principales fortalezas de Webflow es su capacidad para automatizar muchos aspectos técnicos, como el cifrado SSL y el alojamiento de CDN. Esto reduce la necesidad de un mantenimiento constante en comparación con la administración manual de los complementos y las actualizaciones de seguridad de WordPress. Estas características pueden conducir a resultados tangibles: Kisi, por ejemplo, su tráfico de SEO se triplicó tras la migración, y otras empresas han registrado un aumento del tráfico interanual del 1,170%, junto con un aumento del 20% en las conversiones en todo el sitio. Es evidente que una migración bien ejecutada puede generar resultados impresionantes.
Para alejarte de WordPress y, al mismo tiempo, mantener tus URL intactas, tendrás que mantener la misma estructura de URL. A continuación te explicamos cómo hacerlo:
Antes del lanzamiento, prueba minuciosamente todas las URL y redireccionamientos. Este paso es crucial para garantizar una transición sin problemas y proteger tus clasificaciones de SEO.
Al abordar una migración, es inteligente empezar por su páginas más críticas y de alto tráfico - piense en su página de inicio y en las páginas de destino clave. Redirigir primero estas páginas es esencial porque ayuda a proteger tu valor de SEO y garantiza que los visitantes lleguen a donde deberían. Al centrarte en estas páginas, reduces el riesgo de que caigan en la clasificación de búsqueda y creas una experiencia más fluida para los usuarios durante el cambio.
Al mover tu sitio de WordPress a Webflow, es crucial mantener tu SEO intacto. Empieza por hacer un seguimiento de las métricas esenciales, como clasificaciones de búsqueda, tráfico orgánico, y páginas indexadas. Herramientas como Consola de búsqueda de Google puede ayudarlo a detectar errores de rastreo y garantizar que las estructuras de sus URL sigan siendo precisas.
Compara los de tu sitio traficar y clasificaciones de palabras clave antes y después de la migración para identificar cualquier cambio. Auditar tu sitio con regularidad te ayudará a detectar y solucionar cualquier problema que pueda afectar a tu visibilidad en las búsquedas. Mantenerse proactivo garantiza una transición sin problemas sin sacrificar su rendimiento de SEO.
{» @context «:» https://schema.org","@type":"FAQPage","mainEntity":[{"@type":"Question","name":"How ¿puedo migrar sin cambiar mis URL?» , "acceptedAnswer»: {» @type «:"Answer», "text»:» <p>Para dejar WordPress y mantener las URL intactas, tendrás que mantener la misma estructura de URL. He aquí cómo hacerlo:</p> <ul><li>Empieza por auditar tus URL actuales y hacer</li> un registro de tus páginas más importantes. <li>Recrea estas rutas URL exactas en Webflow para que coincidan con tu estructura actual.</li> </ul><li>Si debe realizar cambios, implemente <strong>redireccionamientos 301</strong> para garantizar que tanto los usuarios como los motores de búsqueda se dirijan a las páginas correctas.</li> <p>Antes del lanzamiento, prueba minuciosamente todas las URL y redireccionamientos. Este paso es crucial para garantizar una transición sin problemas y proteger tus clasificaciones de SEO</p>. «}}, {» @type «:"Question», "name» :"¿ Qué páginas deberían recibir primero 301 redireccionamientos?» , "acceptedAnswer»: {» @type «:"Answer», "text»:» <p>Al abordar una migración, es inteligente empezar por las páginas más importantes y de mayor tráfico, pensando en la página de inicio y en las páginas de destino <strong>más importantes</strong>. Redirigir primero estas páginas es esencial porque ayuda a proteger tu valor de SEO y garantiza que los visitantes lleguen a donde deberían. Al centrarte en estas páginas, reduces el riesgo de que caigan en la clasificación de búsqueda y creas una experiencia más fluida para los usuarios durante el cambio</p>. «}}, {» @type «:"Question», "name» :"¿ Cómo puedo comprobar que el SEO no ha disminuido tras el lanzamiento?» , "acceptedAnswer»: {» @type «:"Answer», "text»:» <p>Al mover tu sitio de WordPress a Webflow, es fundamental mantener el SEO intacto. <strong><strong>Empieza por hacer un seguimiento de las métricas esenciales, como las <strong>clasificaciones de búsqueda</strong>, el tráfico orgánico y las páginas indexadas.</strong></strong> Herramientas como <em>Google Search Console</em> pueden ayudarte a detectar errores de rastreo y garantizar que tus estructuras de URL sigan siendo precisas</p>. <p>Compara el <strong>tráfico</strong> y las <strong>clasificaciones de palabras clave</strong> de tu sitio antes y después de la migración para identificar cualquier cambio. Auditar tu sitio con regularidad te ayudará a detectar y solucionar cualquier problema que pueda dañar tu visibilidad en las búsquedas. Mantenerse proactivo garantiza una transición sin problemas sin sacrificar su rendimiento de SEO.</p> «}}]}