


Copy Link
Webflow for Startups: What You Need Before You Build


Now taking new projects
Last updated:
July 2, 2026
Webflow for Startups: What You Need Before You Build
Six pre-build essentials—goal, pages, CMS, approved copy, brand files, and tracking—to launch a lean startup website.
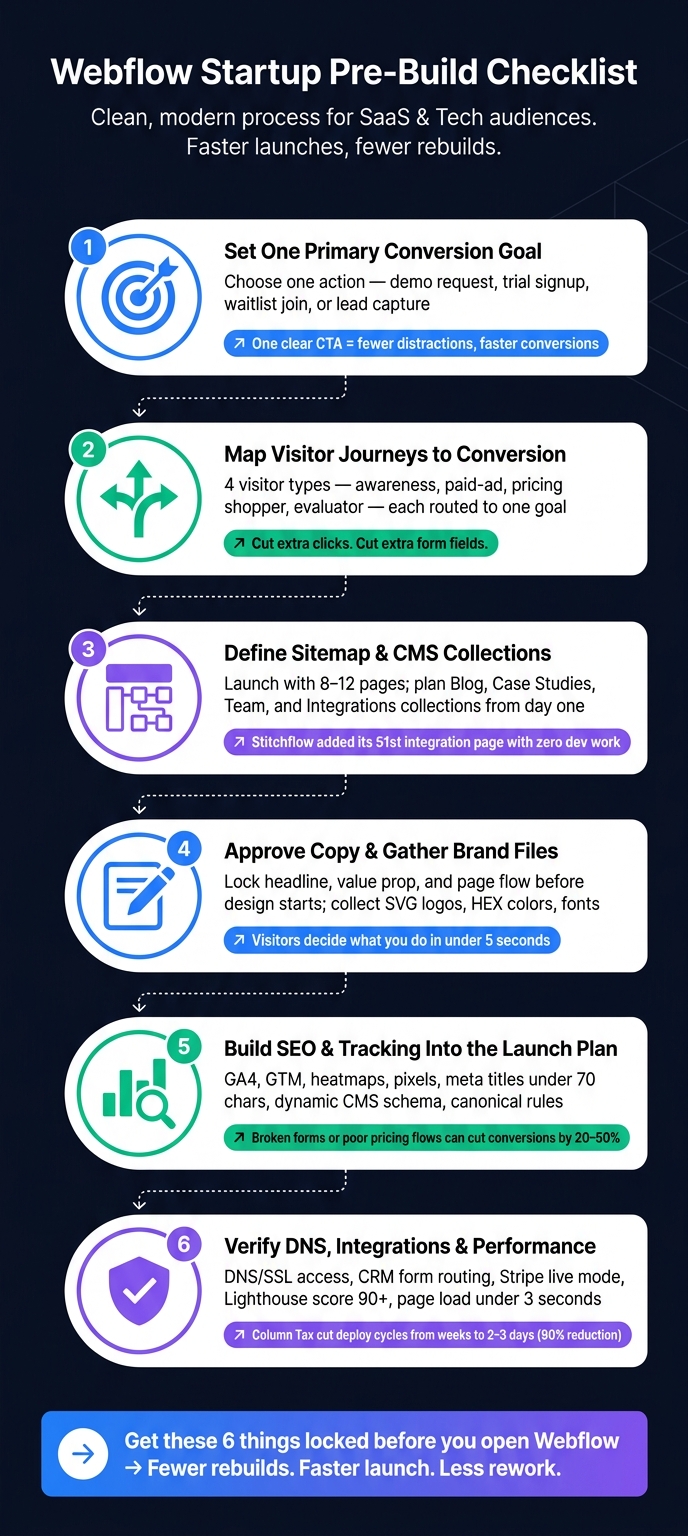
Most startup website problems start before the build. If I had to boil this article down, I’d say this: before I open Webflow, I need six things locked down - site goal, key pages, CMS plan, approved copy, brand files, and tracking/setup access.
Here’s the short version:
- Pick one main conversion goal: demo requests, trial signups, waitlist joins, or lead capture
- Map the shortest path to that goal for each visitor type
- Limit launch scope to the pages that support conversion
- Set the CMS first so blog posts, case studies, and other repeatable pages don’t need rework later
- Approve headline, value prop, and page flow early so design doesn’t get rebuilt around draft copy
- Get SEO, GA4, GTM, forms, CRM, DNS, and QA ready before launch
The article’s main point is simple: a startup site works better when I make the big decisions first. That means clear ownership, a lean sitemap, and working tracking from day one. It also means fewer rebuilds, fewer launch delays, and less back-and-forth once the site is live.
A few numbers stand out:
- Some teams keep deploy cycles down from weeks to 2–3 days
- Good setup can help keep page load times under 3 seconds
- Broken forms or poor pricing flows can hurt conversions by 20%–50%
- Most seed-stage startups can launch with just 8–12 pages
If I want a Webflow site that marketing can update without engineering help, this is the checklist I’d want in place first.
Webflow Startup Website Pre-Build Checklist: 6 Steps Before You Build
FULL WEBSITE LAUNCH CHECKLIST (Free Download) - Do These BEFORE YOU LAUNCH Your Webflow Website
sbb-itb-3a3230e
1. Define what your website needs to do
Before you get into design, decide on the site's one main job. That could be waitlist signups, demo bookings, product education, or showing enough credibility for fundraising. That choice shapes everything that comes next: the pages you need, the content you should write, and the CMS items you should set up.
Set one primary goal and clear conversion actions
When a site tries to do too much, it usually does none of it well. Pick the single action that matters most right now, and make everything else support that action.
For most SaaS startups, that means a short path from early interest to a demo request or trial signup. Secondary actions shouldn't fight with the main CTA. Put the primary conversion in plain view: one clear button and one clear next step.
Keep ownership tight across marketing, sales, and whoever handles follow-up. If those teams aren't aligned, leads can slip through the cracks.
Map the main user paths from landing to conversion
Once the goal is set, map the shortest route to it for each type of visitor. Each path should point to the same main action, not a bunch of equal choices.
| Visitor type | Primary path | Conversion goal |
|---|---|---|
| New/awareness visitor | Homepage → product/features page → social proof/case study → CTA | Demo booking or trial signup |
| Paid-ad visitor | Ad landing page → focused value proposition → short form | Lead capture or booking form |
| Pricing shopper | Homepage or product page → pricing page → FAQ/trust signals → CTA | Trial start or demo request |
| Research/evaluator | Blog/resource → case study → product page → CTA | Demo request or lead capture |
Make the next step obvious. Cut extra clicks. Cut extra form fields. Put one CTA at the end of each path.
Decide what is needed now versus later
Start with the pages that directly support your main conversion:
- Homepage
- Product or Features
- Pricing
- About
- Demo or Contact
Then set up the CMS so the site can grow later, without holding up launch for content you don't have yet.
Column Tax used Webflow to keep load times under 3 seconds and cut deployment cycles from weeks to 2–3 days, a 90% reduction in deploy time.
Launch with the pages that help conversion first. Add support content after that. Once the scope is set, lock the page list and CMS model.
2. Lock the pages, content structure, and CMS model
Once the goal and user paths are set, lock the launch pages and CMS model. Every page and collection should support that single conversion path.
List the core pages and campaign pages needed at launch
Most seed-stage startups can go live with 8–12 pages:
- Homepage
- Product/Features
- Pricing
- About
- Blog/Resources
- Case Studies
- Demo/Trial
If the product isn't live yet, you can keep it much leaner: one landing page, a waitlist form, and a privacy policy are enough.
From there, figure out which pages need proof, forms, or repeat-use CMS content. That step matters more than it sounds. A page might look simple on the surface, but if it needs testimonials, customer stories, or gated assets, the structure has to support that from the start.
Beyond the core pages, map the campaign pages you'll need in the first 90 days after launch. That usually means webinar registration pages, lead magnet download pages, and paid ad landing pages. Even if you build them later, scope them now so the site architecture has room for them.
Plan credibility sections and repeatable content types
Put proof where it helps drive the next click.
A few common placements work well:
- Logo strip under the hero
- Testimonials in the middle of the page
- Badges near pricing or the CTA
That way, proof shows up at the moment a visitor is deciding whether to keep going.
Plan the CMS before building templates
A defined CMS saves you from rebuilding later when you need more blog posts, case studies, or integrations. The better approach is simple: define collections first, then build templates around them.
Stitchflow did this with its integration pages from day one. When the team needed to add its 51st integration, it didn't need new design or development work. They just added a new CMS item. That's the upside of planning the CMS early.
The table below shows the main collections most SaaS startups need at launch and the key fields for each one:
| Collection | Essential Fields | Primary Purpose |
|---|---|---|
| Blog Posts | Title, Author (Reference), Date, Featured Image, Category, Body (Rich Text), Meta Description | SEO acquisition and thought leadership |
| Case Studies | Client Name, Industry, Result Metric, Logo, Hero Image, Rich Text Body | Social proof for buyers comparing options |
| Team Profiles | Name, Role, Bio, Headshot, Social Links, Department | About page depth and credibility |
| Integrations | App Name, Logo, Description, Category, Setup Link, Documentation | Programmatic SEO and integration credibility |
Not every collection makes sense at every stage. A pre-seed team probably doesn't need a Changelog or Competitor Comparison collection yet. But Blog Posts and Case Studies are almost always worth setting up early, even if only a few entries go live after launch.
Also, plan your URL structure early. Paths like /blog/, /resources/, and /customers/ are much harder to change cleanly once the site is indexed.
With pages and collections mapped out, the next step is gathering the messaging and brand assets that will fill them.
3. Prepare messaging, brand assets, and content inputs
Once you’ve mapped the page list and CMS, the next job is simple: fill those pages with the copy, files, and sign-offs the build needs. Website projects often slow to a crawl for one reason - copy, assets, or approvals are still floating around.
Finalize your headline, value prop, and message order
Your homepage headline should be set early. When someone lands on the page, they should understand what you do, who it’s for, and why it matters within five seconds. That’s not much time.
For most core pages, this flow works well: Problem → Solution → Proof → CTA. It gives the page a clear path and helps visitors move from interest to action without extra friction.
Before design or development starts, lock the message order for each main page. Decide what comes first, second, and third. That way, the team isn’t building around filler copy that later gets replaced. When that happens, layouts shift, sections get redone, and time slips away.
Gather the brand files and design rules the build depends on
Missing brand files can throw a project off track in the middle of the build. Get these ready up front:
| Asset | Purpose |
|---|---|
| Logo - SVG + high-res PNG | Prevents pixelation on high-definition displays |
| Favicon - 32×32 and 180×180 PNG or ICO | Required for browser tabs and bookmarks |
| Colors - HEX and RGB values | Ensures exact consistency across pages |
| Typography - font files, heading scale, line heights | Keeps text readable and layout consistent |
| UI rules - spacing, button styles, shadow specs | Prevents visual fragmentation during build |
| Imagery - screenshots, icons, alt text | Supports trust signals and accessibility |
Text should be easy to read, and color combinations should be easy to scan across the page. It’s far easier to bake that in at the start than patch it after launch.
Define reusable components and content ownership
Look for UI patterns that show up across many pages - navigation, footer, CTA sections, feature blocks, testimonial cards, and pricing tables. Plan these as global components. That’s what lets a marketing team update a homepage headline or swap in a new testimonial without touching the structure underneath.
Ownership matters just as much. Before the build starts, decide who owns each content input. That usually means clear owners for copy approval, image sourcing, legal review, and CMS population - often the founder, marketing lead, and the person closest to the product.
If no one owns those steps, review loops drag on and launch dates start sliding.
Once the copy, assets, and owners are set, the next pre-build step is SEO, analytics, domains, and launch QA.
4. Set up SEO, analytics, and technical launch requirements
Once pages, content, and CMS structure are locked, finish the pre-build work with SEO, analytics, and launch requirements.
Prepare the SEO basics that should be built in from the start
Give each URL one primary keyword plus a few supporting secondary keywords. That makes launch traffic easier to measure, convert, and improve later without having to go back and redo the setup.
Page titles should stay under 70 characters and include the primary keyword. Meta descriptions should be 135–160 characters and different for every static and CMS page. For CMS-driven pages like case studies, blog posts, or resource templates, set up dynamic fields for titles, meta descriptions, and JSON-LD schema markup so new content is optimized automatically as it’s published.
A few other launch items matter here too:
- Use short, readable URL slugs that match the page topic and keep click depth shallow
- Keep one H1 per page, then use clear H2s and H3s
- Add descriptive alt text for all non-decorative images
- Create a 301 redirect map for legacy URLs
- Set canonical rules to stop duplicate content on CMS-generated pages
You’ll also want Open Graph defaults for titles, descriptions, and images, plus contextual internal links from top-performing pages to lead-gen pages.
Build these SEO fields into the launch plan from day one - not later, when fixing them gets messy.
Decide what to track before launch
Pageviews tell you traffic is happening. They don’t tell you what people are doing.
Before launch, define the actions that matter most: demo requests, trial signups, pricing page visits, feature engagement, form starts, and resource downloads.
Use GA4 for event tracking and GTM for script management. Add a heatmap or session replay tool like Hotjar or Microsoft Clarity so you can spot where users drop off or stop reading. Install LinkedIn, Facebook, and Twitter tracking pixels before launch.
If time gets tight, focus first on event-level tracking, basic SEO, and light performance tuning before the site goes live.
Confirm domains, integrations, QA, and performance standards
Make sure you have DNS access for A, CNAME, and MX records, and confirm SSL is working across all domains and subdomains. Check that forms send data to your CRM, trigger email sequences, and push Slack alerts to the right people. If you use Stripe, make sure it’s switched from test mode to live mode before the domain goes live.
Aim for a Lighthouse score of 90+ and track Core Web Vitals, especially LCP and INP. Serve images in WebP format, turn on lazy loading for below-the-fold assets, and test the full signup and demo booking flow on real iOS and Android devices - not simulators. Broken forms or confusing pricing can cut conversions by 20–50%.
At launch, submit the XML sitemap to Google Search Console, review robots.txt so priority pages aren’t blocked by mistake, and set up uptime monitoring plus 404 error tracking from day one.
Conclusion: The pre-build checklist that saves time after launch
Once your goals, site structure, content, and tracking are locked in, you have what you need to start building.
A lot of startup websites go off the rails before Webflow even enters the picture. Why? The team starts design and development without clear goals, approved copy, or a clean structure. That usually leads to extra edits, back-and-forth, and a slower launch.
Get the basics in place first, and the build tends to move faster, launch with fewer revisions, and stay easier to grow over time.
Use this final pre-build check before Webflow development begins.
| Checklist Category | What You Need Ready |
|---|---|
| Strategy | Primary goal, ICP, and success metrics |
| Content | Approved headline and value proposition |
| Structure | Lean sitemap (Home, Product, Pricing, Proof, About, Contact) and CMS collection plan |
| Assets | High-res logos, brand color palette, product screenshots, and customer testimonials |
| Technical | Domain/DNS access, GA4/GTM tracking plan, and CRM/email integration list |
| Workflow | One approver for content and a documented launch rollback plan |
If these six areas are ready, Webflow development can begin with fewer revisions and a much clearer path to launch.
There’s also a simple gut check here: if marketing can update and publish the homepage without help from engineering, the pre-build process did its job. Bring clear goals, approved copy, a lean sitemap, and technical access into the build, and the site can go live faster with far less rework.
FAQs
How do I choose the right primary conversion goal?
Pick one main goal that fits your website’s job and where your business stands right now. That could be booking demos, starting trials, getting waitlist signups, or asking for pricing. If you ask visitors to do too many things at once, conversions often drop.
Once you’ve picked that goal, make the next step hard to miss. Use one clear call to action and place it in key spots across the page:
- Header
- Hero section
- Mid-page
- Footer
What should I launch first if my startup is still pre-product?
If your startup is pre-product, focus on validating demand and getting leads. Put up one focused landing page with a clear value proposition, one call to action, and a waitlist or email signup form.
Keep it lean. A few basic legal pages, like a privacy policy, are enough. Skip extra pages and complex features until your data shows you need them.
Which CMS collections should I set up before building?
Before you design anything, map out a CMS structure that can grow with your site and stay easy to run day to day.
Start with the collections that support growth and sales. For most teams, that means things like blog posts, case studies, and team profiles.
Your setup may also need collections for:
- Feature pages
- Integration pages
- FAQs
- Resource hubs
For each collection, define the fields up front. Include basics like titles, body copy, images, and slugs, but also add meta titles and descriptions.
That small bit of planning saves a lot of pain later. It helps you avoid messy workarounds, cuts down on manual updates, and keeps technical debt from piling up as the site grows.