


Insights
Webflow
Copy Link


Step-by-step technical SEO checklist for Webflow: sitemaps, robots.txt, canonicals, Core Web Vitals, redirects, structured data, and performance fixes.
Want your Webflow site to rank higher on search engines? A technical SEO audit is the first step. Webflow provides clean code and fast hosting, but most of its SEO potential lies in manual configurations. Here's a quick summary of what you need to do:
llms.txt file for better context.To kick off your audit, you'll need a mix of free and paid tools to cover all aspects of technical SEO. Google Search Console is a must-have for tracking indexing status, monitoring Core Web Vitals, and submitting XML sitemaps. It’s free and directly connects to Google's crawlers, making it an essential tool.
For site crawls, Screaming Frog is incredibly useful for spotting broken links, redirect chains, and duplicate content. The free version works well for smaller websites, but larger projects might require the paid plan.
Google PageSpeed Insights is another key tool. It helps you measure performance metrics like Core Web Vitals. Aim for these benchmarks:
If you're using Webflow, the built-in Audit Panel within the Designer is great for catching on-page issues like missing alt text, skipped heading levels, and incomplete meta tags. For preparing your site for 2026 AI search standards, check the AEO Assessment Tool in Webflow's Site Settings to evaluate AI readiness. Lastly, Google Analytics 4 is free and provides insights into organic traffic and user behavior.
| Tool | Primary Use | Cost |
|---|---|---|
| Google Search Console | Indexing, sitemaps, and Core Web Vitals tracking | Free |
| Screaming Frog | Site-wide crawl, broken links, and redirects | Free / Paid |
| PageSpeed Insights | Performance metrics (LCP, INP, CLS) | Free |
| Webflow Audit Panel | On-page issue identification (alt text, headings) | Free (built-in) |
| Google Analytics 4 | Traffic tracking and user behavior analysis | Free |
| AEO Assessment Tool | AI search readiness for 2026 compliance | Free (built-in) |
Webflow's SEO settings are divided into three levels: site-level, page-level, and collection-level. To access these, head to your Webflow Dashboard, select your project, and navigate to Site Settings > SEO. Here, you can manage essential elements like your sitemap, robots.txt file, and 301 redirects.
To connect Google Search Console, grab the verification ID from GSC and paste it into the "Google Site Verification" field under Project Settings > SEO. Don’t forget to publish your site after making changes - verification only works once updates are live on your custom domain. Similarly, link Google Analytics 4 by going to Site Settings > Integrations and entering your Measurement ID.
Before running external crawls with Screaming Frog, review your robots.txt file (accessible at yourdomain.com/robots.txt) to ensure it’s not blocking important pages. Also, enable the “Auto-generate sitemap” option in Site Settings > SEO, so your sitemap updates automatically with every publish. For 2026 AI search compliance, set up an llms.txt file. This is typically configured as a redirect from /llms.txt to a plain-text page that provides your company’s context.

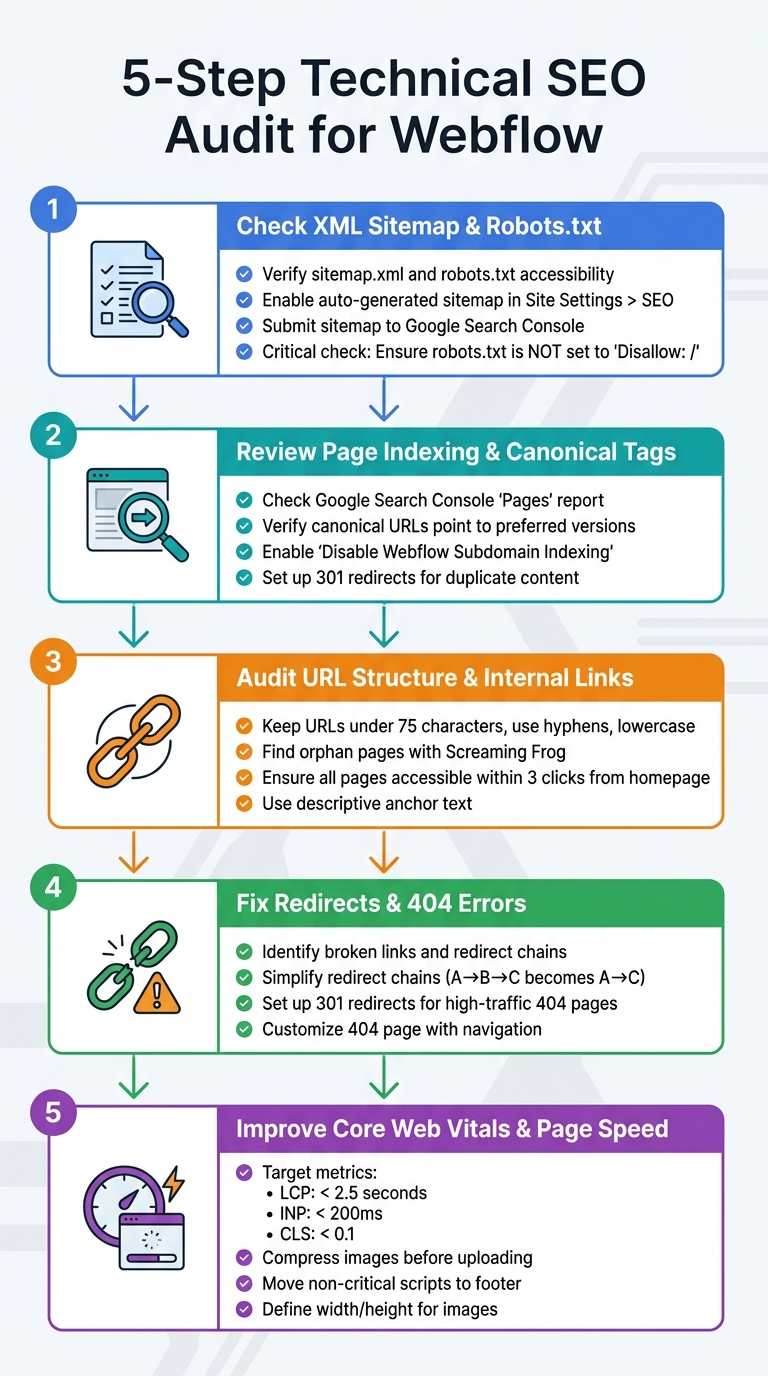
5-Step Technical SEO Audit Process for Webflow Sites
Each step below is designed to strengthen your Webflow site's technical SEO, ensuring it performs well in search engine rankings.
Start by confirming your sitemap and robots.txt files are accessible. You can do this by visiting yourdomain.com/sitemap.xml and yourdomain.com/robots.txt. Your sitemap should list all critical pages, while the robots.txt file should not include Disallow: / unless you're intentionally blocking search engines from crawling the entire site.
"Critical check: Always verify robots.txt is not set to 'Disallow: /' before launch. This single line blocks all search engine crawling of your site, and it's a common staging configuration that gets left in production by mistake".
Make sure the auto-generated sitemap is enabled in Site Settings > SEO. Submit your sitemap URL to Google Search Console under the "Sitemaps" section, and review the "Index Coverage" report for errors like "Submitted URL blocked by robots.txt". For pages like thank-you pages or password-protected areas, manually exclude them from the sitemap by adjusting individual page settings.
Once these files are in order, move on to checking page indexing and canonical tags.
In Google Search Console, use the "Pages" report under "Indexing" to identify which URLs are indexed and which are excluded. Look out for issues like "Excluded by 'noindex' tag" or "Duplicate without user-selected canonical." Ensure every page has a single canonical URL pointing to the preferred version.
In Webflow, you can manage these settings by opening Page Settings > SEO for individual pages. Make sure "Disable Webflow Subdomain Indexing" is enabled to prevent your webflow.io staging site from competing with your live domain. For CMS Collection pages, review the canonical tags in the Collection Settings to ensure consistent application across dynamically generated pages.
If duplicate content is an issue, set up 301 redirects in Site Settings > Redirects to consolidate URLs. Stick to indexing one version of your site, either with or without "www", to avoid splitting domain authority.
With this step complete, you can turn your attention to URL structure and internal linking.
Examine your URL slugs to make sure they're concise (under 75 characters), use hyphens instead of underscores, and are entirely lowercase. Update static page slugs in Page Settings > General, and for CMS items, configure dynamic URL patterns in Collection Settings.
Use tools like Screaming Frog to find orphan pages - those without any internal links pointing to them. Ensure all important pages are accessible from the homepage within three clicks by checking navigation menus, footers, and in-content links.
"The only two factors that make an impact: internal linking and page rendering. Relevant internal links improve visibility, and full page renderability ensures proper indexing".
Organize your site with Webflow's folder system to create a logical hierarchy, such as /services/web-design. Use descriptive anchor text for links instead of vague phrases like "click here". Adopt a pillar-and-cluster model, linking main topic pages to detailed subtopic posts and vice versa.
After this, address any redirect or broken link issues.
Run a site crawl with Screaming Frog or review Google Search Console's "Not Found" report to identify broken links and redirect chains. Redirect chains - where URL A redirects to URL B, which then redirects to URL C - waste link equity and slow down crawlers. Simplify these to a single redirect (A → C) by updating settings in Site Settings > Redirects.
For 404 errors on high-traffic pages or those with valuable backlinks, set up 301 redirects to the most relevant live pages. If a page has no equivalent replacement, update or remove links pointing to it. Customize your 404 page under Pages > Utility Pages > 404 to include navigation menus and links to popular content, helping retain visitors who encounter dead ends.
Validate these fixes in Google Search Console to prompt recrawling. Regularly audit for broken links - quarterly is a good practice - to prevent ranking issues.
Finally, focus on improving your site's performance and Core Web Vitals.
Use Google PageSpeed Insights to test your homepage and key landing pages. Aim for metrics like an LCP (Largest Contentful Paint) under 2.5 seconds, an INP (Interaction to Next Paint) below 200 milliseconds, and a CLS (Cumulative Layout Shift) under 0.1.
Common Webflow performance issues include oversized hero images and unoptimized media files. Compress images before uploading and use Webflow's responsive image settings to deliver the right file sizes for different devices. If LCP is slow, look for render-blocking resources such as custom fonts or third-party scripts in the <head> section - move non-critical scripts to the footer or enable async loading.
For CLS problems, define explicit width and height attributes for images and embeds to avoid layout shifts during page load. Retest your site using PageSpeed Insights and monitor progress in the Core Web Vitals report.
Beyond the basics of a technical SEO audit, there are several extra steps you can take to boost your site's visibility and improve user experience. These suggestions build on earlier recommendations and fine-tune your site's performance.
Make sure your site looks great on mobile devices. You can test this using real devices or tools like Google's Mobile-Friendly Test. With more than half of global web traffic coming from mobile devices, ensuring a responsive design is critical.
For images, switch to modern formats like AVIF or WebP instead of older formats like JPEG or PNG. Webflow offers a built-in image conversion tool in the Assets panel, allowing you to bulk-convert images to these newer formats. AVIF provides better compression and handles complex visuals well, while WebP ensures compatibility with all major browsers. Adjust image loading settings to improve performance: use Eager loading for hero images to enhance Largest Contentful Paint (LCP) and Lazy loading for other images to delay their download until they're visible on the screen.
"Always use modern image formats. Webflow accepts AVIF compressed files that offer high quality at much smaller file sizes than JPEG or PNG." - Flowout
Before uploading, compress individual images to under 200KB, and use SVGs for logos and icons since they are lightweight and maintain quality at any size. Check the "Publishing" tab in Site Settings for warnings about oversized assets, and mark purely decorative images as "Decorative" in the Alt Text settings to improve accessibility.
Use Webflow's Audit Panel to ensure your headings follow a logical order. Avoid skipping levels (like jumping from H2 to H4), and make sure every page has exactly one H1 tag that clearly represents the page's main purpose. Use H2 through H6 tags in descending order for proper structure. If you need a specific style for non-heading text, rely on CSS classes instead of heading tags.
Add structured data to your site to help search engines understand your content better. Focus on high-value pages first. For instance:
Use JSON-LD format for structured data and place the code in the "Inside <head> tag" section of Page Settings. For CMS Collection pages, you can use dynamic fields to populate schema properties like titles or prices automatically. Validate your structured data using Schema.org's validator and Google's Rich Results Test before publishing.
Using question-based headings such as "What is..." or "How to..." can improve visibility in AI-driven search engines and optimize for Answer Engine Optimization (AEO), an emerging focus for 2026. Additionally, create a /llms-txt file with a plain text description of your site and set a 301 redirect from /llms.txt. This helps large language models better understand your site's context.
In Site Settings > Hosting, confirm that SSL is enabled. Webflow offers free SSL certificates as part of its hosting performance features, which not only secure data but are also a confirmed ranking factor for Google. If your site doesn't display a browser padlock icon, check for hardcoded "http://" links in custom code or asset URLs, as these can trigger mixed content warnings.
In Site Settings > SEO, set "Disable Subdomain Indexing" to "Yes" to ensure your webflow.io staging site doesn't compete with your live domain in search results. Before publishing, enable options like "Minify HTML", "Minify CSS", and "Minify JS" in the Publish dropdown menu to reduce file sizes and speed up loading times.
Review third-party scripts such as analytics tools or chat widgets in your custom code sections. Configure these to load asynchronously or defer their loading to avoid blocking the main thread, which can negatively impact Core Web Vitals. Lastly, set your site's language code in Site Settings > General to help search engines and screen readers process your content accurately. These steps, when combined, ensure your site is well-prepared for continued SEO improvements.
Once your audit is complete, it's time to organize and tackle the issues. Start by grouping them based on urgency and potential impact. Focus first on Critical issues - these are the ones that directly block search engines from crawling or indexing your site. Think of problems like missing SSL certificates, broken sitemaps, or "noindex" tags on key pages. These can wreak havoc on your rankings and need immediate attention.
Next, address Important issues that moderately affect your site's performance. Examples include oversized image files or missing alt text. Aim to resolve these within 30 days. Finally, handle Optimal fixes - such as adding FAQ schema markup - when you have extra time. These tweaks can give you an edge, but they won’t make or break your rankings.
As you work through the issues, track them in a table. Note the problem, where it’s located in Webflow, and how it can be fixed. For instance, missing title tags can be found under Pages > SEO Settings, while broken links should be redirected using Site Settings > Redirects. Pay extra attention to high-impact areas like internal linking and page rendering. Also, check your subdomain settings in Site Settings to ensure your .webflow.io staging site isn’t competing with your live domain in search results.
Once your priority list is ready, start implementing fixes and verifying their success.
After applying fixes, it’s essential to test and monitor their effectiveness. Use the URL Inspection Tool in Google Search Console to request a recrawl of updated pages and confirm the changes have taken effect. Then, run Google PageSpeed Insights to check if your Core Web Vitals metrics, like Largest Contentful Paint (LCP) and Interaction to Next Paint (INP), have improved. Ideally, aim for an LCP under 2.5 seconds and an INP below 200 milliseconds.
Set up a routine for ongoing monitoring. Schedule monthly check-ins with Google Search Console to catch any new coverage errors or mobile usability problems. Additionally, perform a comprehensive site audit every quarter using tools like Screaming Frog or Ahrefs. These audits can help you identify new broken links or outdated metadata that may have cropped up during recent updates. By sticking to this maintenance schedule, you’ll keep your Webflow site in peak condition and maintain its competitive edge in search rankings.
A successful Webflow SEO audit focuses on three key areas: site speed, proper heading structure, and correct indexing. These factors are crucial for ensuring that search engines can effectively crawl and rank your site, ultimately increasing its visibility.
While Webflow offers a strong foundation with its clean codebase and fast hosting - achieving a Time to First Byte (TTFB) between 50 and 150 milliseconds - its true SEO potential lies in how well you configure it. Relying solely on default settings won't cut it. The difference between a site that ranks well and one that struggles often comes down to manual optimizations like those outlined in this guide. These optimizations, combined with regular maintenance, are essential for achieving and sustaining long-term SEO success.
Once your audit is complete, the next step is to focus on maintaining your site's SEO health. Technical SEO isn't a "set it and forget it" task. As you update your site, new errors may arise that need immediate attention. Plus, search engines frequently update their algorithms, meaning you'll need to adapt to stay competitive.
To stay on top of things, establish a regular monitoring routine. Tools like Google Search Console, Screaming Frog ($149/year), or Ahrefs ($99–$399/month) can help you identify and fix new issues as they appear. Pay close attention to Core Web Vitals through the "Experience" section in Google Search Console, ensuring all pages maintain a "Good" status. Looking ahead to 2026, this includes keeping newer metrics like Interaction to Next Paint (INP) under 200 milliseconds.
If you're facing persistent challenges or want to implement advanced strategies like schema markup or Answer Engine Optimization (AEO) for AI-driven search results, collaborating with an SEO professional familiar with Webflow's architecture can make a significant difference. Fully leveraging Webflow's capabilities means moving past the basics and committing to ongoing optimization.
To kick off your SEO strategy, tackle the most essential tasks first. Start by verifying your website with Google Search Console - this tool is your direct line to understanding how Google views your site. Next, submit your sitemap to ensure all your pages are discoverable by search engines. Lastly, address any coverage errors flagged in Search Console. These errors can prevent proper indexing, so fixing them early is crucial for improving your site's visibility and search performance.
To ensure your Webflow staging subdomain isn't indexed by search engines, navigate to Site settings > SEO > Indexing section. Set Staging indexing to off, then save and publish your site. This updates the robots.txt file, signaling search engines to skip indexing the subdomain.
To boost your Core Web Vitals in Webflow, focus on three key areas: images, scripts, and layout stability.
By addressing these areas, you'll see noticeable improvements in your site's performance metrics.